4.09.2 Use features and tools of the Microsoft Windows 10 operating system (OS) Part 2
Introduction
In this lesson, you'll learn how to efficiently manage hardware, software, and system settings on your computer using built-in Windows tools like Device Manager, Disk Management, and the Group Policy Editor.
These tools are essential for troubleshooting, updating drivers, managing storage, configuring user accounts, and setting up security policies, especially in environments where multiple devices are in use.

Imagine a situation where a computer suddenly starts running slow due to low disk space, or a user’s access to a shared folder is restricted. What steps would you take to diagnose and resolve these issues? How would you manage a network of devices to ensure that everything works smoothly? Throughout this lesson, you’ll discover the tools that can be used to solve these types of problems and more, empowering you to effectively maintain system performance and security.
Device Manager Overview
Device Manager (devmgmt.msc) lets you view and edit the properties of installed hardware. You can:
Change hardware configuration settings
Update drivers
Remove or disable devices

Device Manager can be launched by selecting Start + R > type devmgmt.msc > OK

Updating and Troubleshooting Devices
Sometimes Windows can detect a device but may not find the right driver, resulting in an "Unknown Device" or a device with a yellow exclamation mark indicating a problem.
Steps to troubleshoot and update devices:
Check compatibility: Ensure the device or driver is compatible with your operating system.
Download updated drivers: Manufacturers often release updates to fix issues. These can be downloaded from the manufacturer's website.
Windows Update: Sometimes, driver updates are available as optional updates through Windows Update.
Manual updates:
In Device Manager, locate the device.
Right-click and select Properties.
On the General tab, view the device status.
Go to the Drivers tab and click Update Driver to install a new driver.
Removing, Uninstalling, and Disabling Devices
Hot-swappable devices (like storage devices) can be removed without uninstalling:
Safely remove the device by clicking the Safely Remove Hardware icon in the taskbar and selecting Stop/Eject.
This leaves the driver installed so the device can be re-detected if reconnected.
To uninstall the driver:
Right-click the device in Device Manager.
Select Uninstall device before physically unplugging it.
Disabling a device:
You can disable a device if it's not working or for security reasons.
Disabled devices are marked with a down arrow in Device Manager.
Disk Management Console Overview
The Disk Management console (diskmgmt.msc) is used to manage the disk subsystem of your computer, which stores the operating system, applications, and data files. Managing the performance and reliability of the disk subsystem is critical for keeping your system running smoothly.

The Disk Management console can be launched by selecting Start+ R > type diskmgmt.msc > OK

What Disk Management Displays
The Disk Management console shows a summary of all fixed and removable disks attached to your system, such as:
Hard disk drives (HDDs)
Solid state drives (SSDs)
Optical drives
Disks are divided into partitions, and each partition is shown as a volume in the Disk Management console.
Understanding Drive Terminology
Partitions: Divisions of a physical disk (HDDs, SSDs).
Volumes: Logical storage units available to the OS. Volumes can be created from one or multiple partitions, including RAID configurations.
Drive: A volume that has been mapped to a letter (e.g., C:). The term "drive" is also commonly used to refer to physical hardware.

Disk Layout Overview
Typically, the main disk (Disk 0) contains the operating system and has at least three volumes:
System Volume: Holds the boot files (usually using the Extensible Firmware Interface, EFI). Not assigned a drive letter.
Boot Volume: Contains the operating system files (usually drive C:).
Recovery Partitions: Tools for repairing or restoring the system to factory settings. These do not have drive letters.
Disk Management Tasks
The Disk Management console supports several key tasks:
Initializing Disks
New disks (HDDs, SSDs, thumb drives) need to be initialized.
Choose between partition styles:
Master Boot Record (MBR): allowing up to 4 primary partitions and up to 2TB of disk space; compatible with older BIOS-based systems; but more prone to data corruption and less resilient.
or GUID Partition Table (GPT): offers virtually unlimited number of partitions and supports disk larger than 2TB (up to 9.4 zettabytes); compatible with both UEFI-based and BIOS-based systems, making it more versatile for modern hardware configurations; more robust and provides better data protection and recovery options.
Partitioning Disks
Each disk requires at least one partition.
You can create a new partition by right-clicking on unpartitioned space.
Formatting Partitions
New partitions must be formatted with a file system (e.g., NTFS or FAT32).
Reformatting will delete all files on a partition.
Choose a volume label and allocation unit size (cluster size).
Repartitioning- Existing partitions can be expanded, removed, or shrunk to make space.
Dynamic Disks
You can configure dynamic volumes (software RAID) across multiple disks for redundancy, such as mirroring.
Note: Dynamic disks are now deprecated in favor of Storage Spaces.
File Systems and Allocation Units
File systems: NTFS is commonly used for most drives, while FAT32 is used for smaller, removable drives.
Cluster sizes: Smaller clusters use disk space efficiently, while larger clusters improve file input/output (I/O) performance, especially with large files.
Advanced Format: Some disks use 4K sector sizes for better efficiency, while others may operate in 512e mode for compatibility.
Restrictions on System and Boot Partitions
You cannot format or delete the system or boot partitions.
During setup:
The boot partition must be formatted as NTFS.
The system partition must be formatted as FAT32.
Disk Maintenance Tools Overview
Disk drives and file systems require regular attention to maintain optimum performance. There are three main issues that affect file storage:
Fragmentation: Files get spread out across non-contiguous clusters, slowing down read performance.
Capacity: As files accumulate, disk space decreases, and performance drops if the boot volume has less than 20% free space. A warning is triggered if space falls below 200 MB.
Damage: Hard disks can be physically damaged, leading to corrupted files. SSDs can degrade over time or suffer from impacts, overheating, or electrical issues.
These problems can be prevented with regular use of disk maintenance tools, which should be run monthly and before installing software.
Disk Defragmenter
The Defragment and Optimize Drives tool (dfrgui.exe) improves performance on both HDDs and SSDs:
On HDDs, defragmentation:
Rewrites file data to contiguous clusters.
Reduces the time it takes for the disk controller to find and read files.
On SSDs, the optimizer:
Runs a TRIM operation, marking deletable data and making blocks writable again.
Performs a type of defragmentation if the SSD holds the OS and Volume Shadow Copy is enabled.
Windows automatically schedules the optimizer using Task Scheduler, but it’s important to check for any issues if it doesn't run successfully.

The Defragment and Optimize Drive can be launched by selecting Start+ R > type dfrgui.exe > OK

Disk Clean-up
The Disk Clean-up tool (cleanmgr.exe) helps reclaim disk space by erasing unnecessary files, such as:
Files in the Recycle Bin
Temporary files and caches
Running the tool in administrator mode (using the Clean up system files option) allows you to clean up system caches, such as those used by Windows Update and Defender.

Disk Clean-up can be launched by selecting Start + R > type cleanmgr.exe > OK

Task Scheduler Overview
The Task Scheduler (taskschd.msc) automates running commands, scripts, or applications based on a set schedule. Many Windows processes have predefined schedules, but you can create custom tasks that run:
Once at a future date or time.
On a recurring schedule.
Tasks can include applications, batch files, or scripts.

Task Scheduler can be launched by selecting Start + R > type taskschd.msc > OK

Key Features of Task Scheduler
Triggers: Tasks can be triggered by events (e.g., user sign-in or when the computer wakes from sleep) instead of just a specific time.
Multiple Actions: A task can perform several actions.
Logging: All activity is logged, making it easy to troubleshoot failed tasks.
Task Organization: Tasks can be organized into folders for better management.
Creating and Managing Tasks
When setting up a task, you need to:
Define the path to the file or script to execute.
Set a trigger (e.g., a specific date, time, or event).
Enter user credentials for the task to run. Make sure the selected account has the required permissions, or the task will fail to run.
Local Users and Groups Console Overview
The Local Users and Groups console (lusrmgr.msc) provides an advanced interface for managing user accounts. It allows you to:
Create, modify, disable, or delete user accounts.
Reset passwords for user accounts.

Local Users and Groups console can be launched by selecting Start + R > type lusrmgr.msc > OK

Security Groups
Security groups are used to organize user accounts with similar permissions. This makes it easier to manage access to resources, such as shared folders. Key points include:
Default groups include:
Administrators: Full system privileges.
Users: Standard account permissions.
Guests: Limited access.
Adding a user to the Administrators group gives them full privileges.

Certificate Manager Overview
Digital certificates are used to verify the identity of users, computers, or services. Each certificate’s validity is backed by a Certification Authority (CA). The Certificate Manager console (certmgr.msc) lets you view installed certificates and manage requests for new ones.
Key Folders in Certificate Manager
Personal folder: Stores certificates issued to the user account, used for tasks such as:
Authenticating to a network.
Encrypting data.
Adding digital signatures to documents or messages.
Trusted Root Certification Authorities: Contains certificates from trusted issuers like:
Microsoft CAs.
Local enterprise CAs.
Third-party CAs (mostly managed via Windows Update).
Third-party Root Certification Authorities: Stores certificates from issuers other than Microsoft or local enterprise.
Managing Certificates
The Certificate Manager (certmgr.msc) manages certificates for the current user, while certlm.msc manages certificates for the computer.
Be cautious when trusting a Certification Authority (CA), as trusting an unsafe CA can create security vulnerabilities.
For example:
A rogue CA could allow a fake website to appear legitimate, tricking users into submitting personal information like passwords.
Use Certificate Manager to remove compromised certificates when necessary.

Third-Party Certificate Stores
Browsers and third-party applications often maintain their own store of personal certificates and trusted root CAs, separate from Windows.
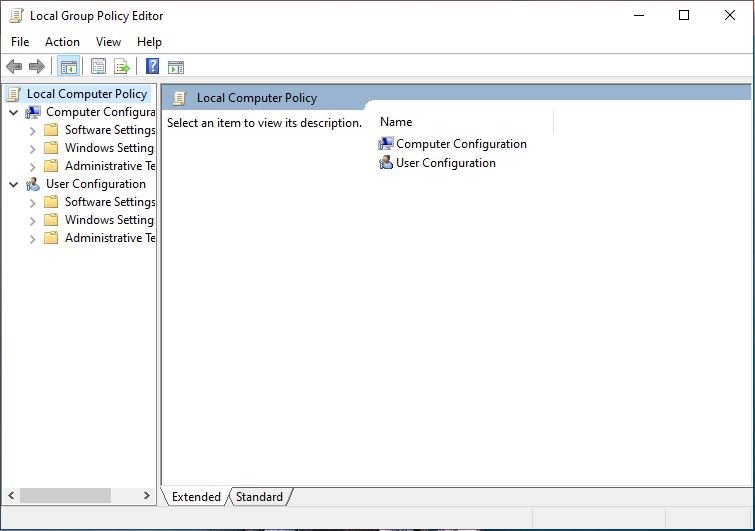
Group Policy Editor Overview
The Group Policy Editor (gpedit.msc) allows you to configure a wide range of Windows settings that are not available through GUI tools like Settings or Control Panel. It offers more control over system and user settings than directly editing the registry. Additionally, third-party vendors can create administrative templates to manage their software via group policies.
Key Features of Group Policy Editor
Allows for more advanced configuration of Windows settings not accessible via normal GUI tools.
Vendors can add third-party software settings through administrative templates.
Efficient Network Management
On large networks with many computers, group policy is a more efficient way to apply policy settings compared to manually configuring each machine. This helps in ensuring consistency across all systems.
Configuring Policies
Some policies are configured by entering a discrete value.
Most policies use a toggle with the options:
Enabled
Disabled
Not Defined
It’s important to carefully read each policy and understand the default behavior of leaving a setting as "Not Defined."
Security Policies
To modify security settings specifically, you can use the Local Security Policy editor (secpol.msc).
Registry Editor Overview
The Windows registry is a database that stores configuration information for the operating system, devices, and applications. You can use the Registry Editor (regedit.exe) to view or modify the registry.

Registry Keys
The registry is organized into five root keys, which contain both system-wide and user-specific settings:
HKEY_LOCAL_MACHINE (HKLM): Contains settings for the entire computer.
HKEY_USERS (HKU): Holds settings for all user profiles on the computer.
HKEY_CURRENT_USER (HKCU): Stores settings for the currently logged-in user.
HKEY_CURRENT_CONFIG (HKCC): Contains information about the current hardware profile.
HKEY_CLASSES_ROOT (HKCR): Manages file associations and COM (Component Object Model) objects—building blocks of software that allow different programs to work together, even if they are written in different programming languages.
Registry Structure and Files
The registry database is stored in hives, which consist of:
A primary file with no extension.
A .LOG file containing a transaction log.
A .SAV file, a copy of the key at the end of setup.
The system hive includes an .ALT backup file.
Most hives are stored in C:\Windows\System32\Config, while user profile hives (NTUSER.DAT) are located in the user's profile folder.
Editing the Registry
Each root key contains subkeys and value entries:
Subkeys: Similar to folders, used to organize settings.
Value entries: Contain three parts:
Name of the value.
Data type (e.g., string or binary).
The value itself.
Use the Find tool to search for specific keys or values.
Exporting and Importing Registry Data
To copy parts of the registry and use them on other computers:
Select File > Export Registry File.
The file will be saved in a registry-compatible format.
To merge the file into another computer’s registry, simply double-click it or call it from a script.
Custom Microsoft Management Consoles (MMC)
A Microsoft Management Console (MMC) is a framework that allows you to add snap-ins—tools like Device Manager, Disk Management, Group Policy Editor, and Certificate Manager. You can use the mmc command to customize and create your own console by selecting snap-ins that meet your needs.
Key Features of Custom MMCs
Snap-ins: These are the individual tools that can be added to an MMC. For example:
Device Manager
Disk Management
Group Policy Editor
Certificate Manager
You can create a custom console by adding your preferred snap-ins and save it as an MSC file in the Administrative Tools folder.
Managing Local or Remote Computers
Most MMC snap-ins can be used to manage both the local computer and remote computers on the same network.
Summary
In this lesson, you’ve gained valuable insights into the powerful tools Windows provides, like Device Manager, Disk Management, and Group Policy Editor. These tools equip you to troubleshoot, optimize, and manage systems efficiently, whether you're updating drivers, configuring storage, or setting user permissions. By applying these skills, you'll be more confident in handling everyday technical issues and ensuring smooth operations across multiple devices. Keep practicing, and you'll become even more adept at resolving challenges and maintaining system performance with ease!